- EasyApps Pro
- UPDATES
- SUPPORT
- CARRIER PARTNERS
- REVIEWS
- Testimonials
- Pittsburgh Insurance Agency
- Connelly-Weiss
- Pebsworth Insurance Agency, Inc.
- Heritage West Insurance
- John Knight
- Excel Insurance Agency
- Ken Myles
- Kathy Bayes Insurance
- American Insurance Management
- Darrell Haynes
- Mark Ball Insurance
- DLB Insurance Marketing
- Crook Financial Services
- Clark Insurance Agency
- Jan Jesberger Insurance
- Auto Risk Consultants, Inc.
- Kelly King Insurance
- Howard Insurance & Associates
- Pat Fox
- Sano Brokerage Company
- Ostrowski and Associates, Inc.
- Pickard Insurance Agency
- Five Brothers Insurance
- Reilly Insurance
- Frias Insurance Agency
- Norman Cathell
- McCall Insurance Agency
- Frizzell and Company
- Bauman Agency
- McShea Insurance Company
- Ledbetter Ins. Agency
- Hallam Insurance Agency
- Jonathan Steinberg
- Eagle Insurance
- Brooks Agency
- Maningo Group Insurance
- J Michael and Associates
- Mosier Insurance Agency
- Pizzichillo Agency
- Fredericks Insurance Agency
- Anwar Insurance Agency
- Testimony Form
- Pittsburgh Insurance Agency
- Connelly-Weiss
- Pebsworth Insurance Agency, Inc.
- Heritage West Insurance
- John Knight
- Excel Insurance Agency
- Ken Myles
- Kathy Bayes Insurance
- American Insurance Management
- Darrell Haynes
- Mark Ball Insurance
- DLB Insurance Marketing
- Crook Financial Services
- Clark Insurance Agency
- Jan Jesberger Insurance
- Auto Risk Consultants, Inc.
- Kelly King Insurance
- Howard Insurance & Associates
- Pat Fox
- Sano Brokerage Company
- Ostrowski and Associates, Inc.
- Pickard Insurance Agency
- Five Brothers Insurance
- Reilly Insurance
- Frias Insurance Agency
- Norman Cathell
- McCall Insurance Agency
- Frizzell and Company
- Bauman Agency
- McShea Insurance Company
- Ledbetter Ins. Agency
- Hallam Insurance Agency
- Jonathan Steinberg
- Eagle Insurance
- Brooks Agency
- Maningo Group Insurance
- J Michael and Associates
- Mosier Insurance Agency
- Pizzichillo Agency
- Fredericks Insurance Agency
- Anwar Insurance Agency
- Demos
215 W Commerce Dr
Hayden Lake, ID
83835
voice
800.342.7327
fax
208.762.1265
Setting Backups as a Scheduled Task
As more and more of our customers use our products to store client documents and images, we find that the size of their backup files; as well as the time required to run those backups; is growing exponentially. AgencyPro and EasyApps use an automated backup procedure that measures the last backup date against the current date. This procedure is activated when the first user enters the system on the backup date. Some of our customers complain that the first person in can wait as long as 30 minutes before they can start using the program, while the backup program is running. This has led to some customers ‘killing’ the backup program so that they can get in, which leads to incomplete backups and a possible exposure to data loss.
This document describes how to run the backup program as a Scheduled Task using Windows Task Scheduler. As long as the computer is on, the backup program can be scheduled to run in the middle of the night once per week or so. Once the backup has been run, EasyApps and AgencyPro will not try to create another backup until the ‘# of Days Between Backup’ has been satisfied on the Agency Setup tab.
To create a Scheduled Task backup, first designate which machine will be kept on overnight to run the process. You will only want to set this task on one machine, which will typically be the server computer. To start the Windows Task Scheduler click: Start / All Programs/ Accessories / System Tools / Task Scheduler. You should see something similar to the following screen (a little different on Vista):

From here you want to ‘Add Scheduled Task’ or ‘Create Task’ (Vista) which will present the following screen:

Click ‘Next’. You should then see:
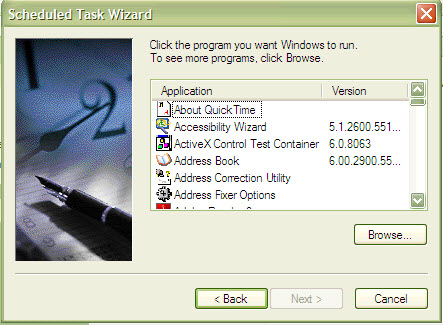
Click ‘Browse’, which will present a Browse dialog:
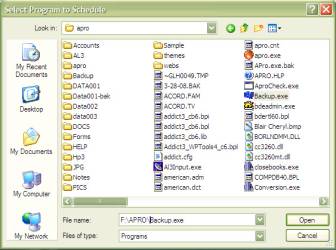
Navigate the dialog to your APRO or EAPPW folder on your server drive letter and find the Backup.exe program, or manually enter the location in the File Name area, and click ‘Open’
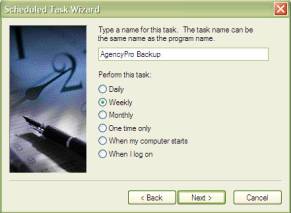
This dialog allows you to change the Task Name from ‘Backup’ (generic) to ‘AgencyPro Backup’ (specific) and set the frequency. Choose ‘Weekly’ and click ‘Next’.
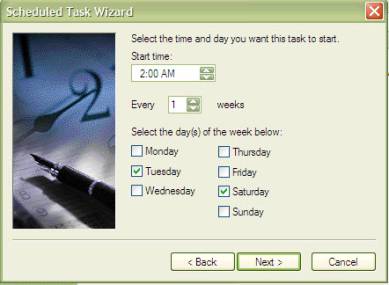
This dialog allows you to set your Start Time and days to run the task. Choose a time when AgencyPro or EasyApps will not be used in the office, but when the computer will be left on. Also set the days that you want the backup to run and click ‘Next’.
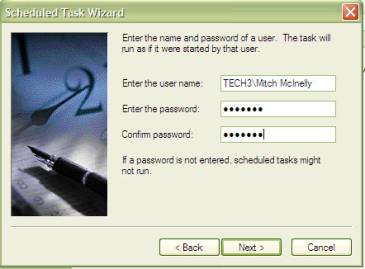
On this screen, you will need to enter the Username and Password of a user that is an Administrator of this computer for the backup to run properly. When done, click ‘Next’.
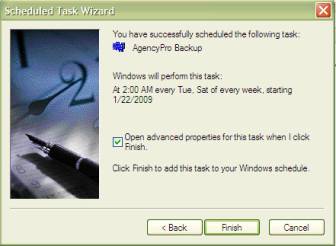
On this screen click the checkbox at ‘Open Advanced properties’ and click ‘Next’.
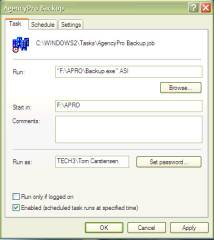
On this screen you will need to put double quotes around F:\APRO\Backup.exe, followed by a space, and then the capital letters ‘ASI’. This will allow the backup program to run silently without user interaction. If you don’t do this, the backup program will start as un-silently and you will have to click ‘OK’ to start it when you get to the office in the morning.
After you have put the double quotes and ‘ASI’ in the run line, you will click the ‘Settings’ tab.
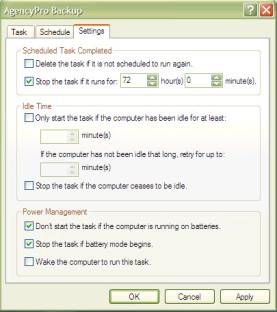
If the computer is a laptop computer, you will want to uncheck the first two entries under Power Management. You might also set the ‘Stop the task if it runs for:’ entry to one or two hours instead of 72. Click ‘OK’ to save your changes.
Now that we’ve created the new task, it’s time to test it. You should see the all of your scheduled tasks. Find your new task and right click on it
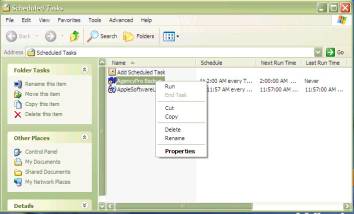
and then click on ‘Run’. If your task has been set up correctly, you will see the  icon appear on the Windows taskbar for a bit and then go away. If you see the entire Backup dialog and have to click ‘OK’ to continue, you need to right click on your task again, select ‘Properties’ and make sure your tasks Run Line has F:\APRO\BACKUP.EXE wrapped in quotes, followed by a space and then the letters ASI. If your task did not start at all, make sure that you have put in an administrator’s username and password, or you may need to uncheck the Power Management options as outlined above.
